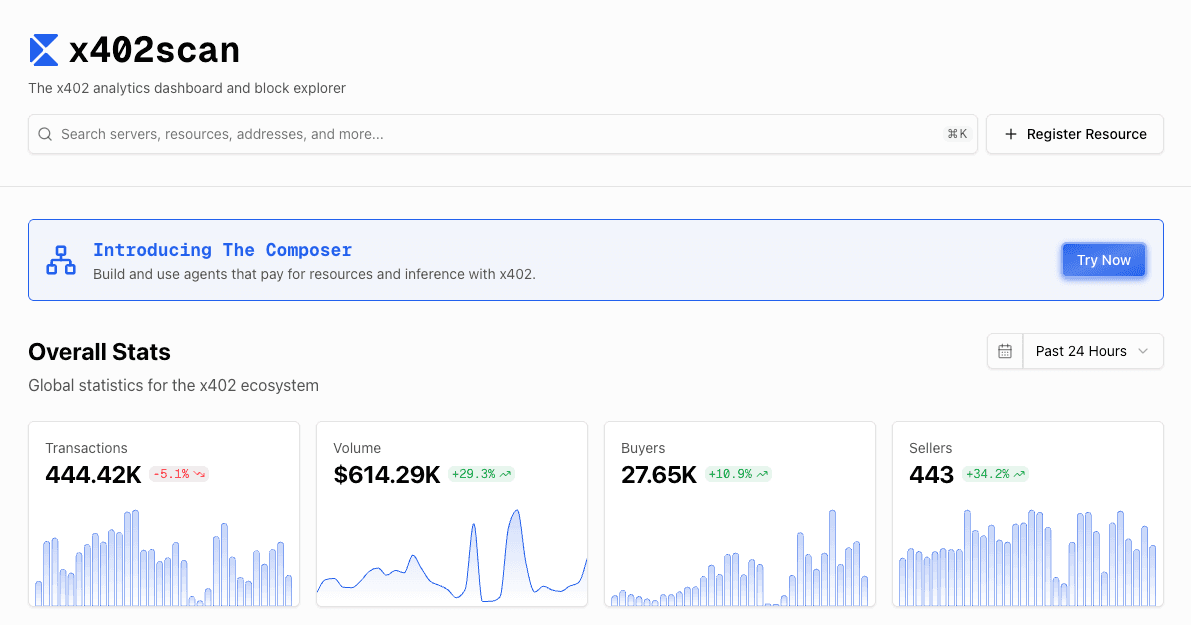
What x402 endpoints do for analytics
x402 is an open HTTP payment protocol that changes how AI agents access on-chain data. Instead of relying on static API keys, servers using this standard return a 402 Payment Required status code with embedded payment instructions. This allows agents to pay in stablecoins directly through the request header, removing the need for human intervention or pre-funded wallets for every query.
For chain analytics, this means you can monetize data without managing user accounts. When an agent requests data from a supported endpoint, it receives the payment details, executes the transaction, and automatically retries the request with the proof of payment. This creates a seamless, programmatic workflow where data access is tied directly to micro-transactions.
This approach eliminates the friction of key management and billing cycles. Agents can fetch real-time metrics, historical data, or specific blockchain states on a per-request basis. The protocol ensures that providers get paid instantly while agents gain access to high-value analytics without complex integration overhead.
Set up your wallet and facilitator
Before you can expose a payment-gated x402 endpoint, you need two things: a wallet capable of signing transactions and a facilitator to route those payments. The facilitator acts as the bridge between your API and the blockchain, handling the complex logic of verifying crypto payments and relaying them to your endpoint.
For this setup, you will use a compatible wallet to hold funds for gas and a facilitator like Thirdweb or Coinbase CDP to manage the transaction flow. This section walks you through creating that infrastructure so your API can start accepting USDC payments.
Start by generating a wallet that supports the chain your analytics API will run on. For x402, wallets like MetaMask or those generated programmatically via SDKs (such as Thirdweb's SDK) are standard choices. Ensure the wallet has a small amount of native gas tokens (like ETH on Ethereum or USDC on Arbitrum) to cover transaction fees when the facilitator processes payments.
Choose a facilitator to handle the payment verification logic. Thirdweb and Coinbase CDP are the two primary options. If you use Thirdweb, install their x402 facilitator package and initialize it with your wallet's private key. This facilitator will listen for incoming payment requests and validate them before your API serves data. Follow the Thirdweb x402 documentation for specific initialization code.
Once your facilitator is running, generate the API keys needed to connect your backend to the payment gateway. These keys authenticate your requests when checking payment status. Store these keys securely in your environment variables. If you are using Coinbase CDP, refer to their Quickstart for Sellers guide to generate the necessary credentials and configure the webhook endpoints that notify your server when a payment is confirmed.


As an Amazon Associate, we may earn from qualifying purchases.
Integrate payment logic into your API
To turn a standard endpoint into an x402-compliant service, you need to intercept the request before it reaches your core business logic. The x402 standard relies on the Authorization header carrying a signed payload. Your code must extract this payload, decode the transaction details, and verify that the payment has settled on the blockchain before returning any sensitive data.
This process acts as a gatekeeper. Without it, your API remains vulnerable to free usage or, worse, unauthorized access to paid data streams. By embedding this validation directly into the endpoint handler, you ensure that every response is backed by a verified on-chain transaction.
Start by parsing the incoming request headers. Look for the Authorization field. According to the x402 specification, this header contains the signed payment payload. If the header is missing or malformed, immediately return a 402 Payment Required response. Do not proceed to your business logic until you have a valid header to inspect.

Once you have the header, decode the base64-encoded JSON payload. This payload contains the transaction hash, the chain ID, the amount paid, and the sender's public key. Extract these fields to understand what the caller is attempting to purchase. This step ensures you know which specific data or service tier the user has paid for.
This is the most critical step. You must verify that the transaction hash exists on the specified blockchain and that the payment has reached the required number of confirmations. Use a blockchain explorer API or a node provider to check the status. If the transaction is pending, too new, or has failed, reject the request. Only proceed if the funds are confirmed in the recipient wallet.
With the payment verified, you can now execute your core logic. Fetch the requested analytics data from your database or external source. Return the data in the response body with a 200 OK status code. Ensure your response includes any relevant metadata about the transaction, such as the transaction hash, for audit purposes.
Implementation Example
Below is a conceptual example in Node.js demonstrating how to parse the header and validate the transaction. This snippet assumes you are using a library like ethers.js or a similar blockchain interaction tool.
const express = require('express');
const app = express();

app.get('/api/analytics', async (req, res) => {
  // 1. Extract the Authorization header
  const authHeader = req.headers.authorization;
  if (!authHeader) {
    return res.status(402).json({ error: 'Payment required' });
  }

  try {
    // 2. Decode the payload (simplified)
    const payload = JSON.parse(Buffer.from(authHeader.split(' ')[1], 'base64').toString());
    const { txHash, chainId } = payload;

    // 3. Verify on-chain settlement
    const isConfirmed = await verifyTransaction(txHash, chainId);
    if (!isConfirmed) {
      return res.status(402).json({ error: 'Transaction not confirmed' });
    }

    // 4. Return data
    const data = await getAnalyticsData();
    res.json(data);
  } catch (error) {
    res.status(500).json({ error: 'Internal server error' });
  }
});
By following this sequence, you ensure that your API endpoints are secure, monetized, and compliant with the x402 standard. Always test your implementation with testnet transactions before deploying to mainnet to avoid losing real funds during debugging.
Test with existing analytics providers
Use x402 Endpoints for Chain Analytics APIs works best as a clear sequence: define the constraint, compare the realistic options, test the tradeoff, and choose the path with the fewest hidden costs. That order keeps the advice usable instead of decorative. After each step, pause long enough to check whether the recommendation still fits the reader's actual situation. If it depends on perfect timing, unusual access, or a best-case budget, include a simpler fallback.
| Factor | What to check | Why it matters |
|---|---|---|
| Fit | Match the option to the primary use case. | A good deal still fails if it does not fit the job. |
| Condition | Verify age, wear, and service history. | Hidden condition issues erase upfront savings. |
| Cost | Compare purchase price with likely upkeep. | The cheapest option is not always the lowest-cost option. |
Common integration mistakes to avoid
When building with x402 endpoints, small oversights can break payment flows or leave your analytics data stranded. The protocol is simple, but the implementation details require precision, especially when dealing with blockchain confirmations and async settlement.
1. Incorrect Header Formatting
The Authorization header must follow the exact Bearer token structure defined in the x402 specification. A common error is passing raw wallet signatures or omitting the Bearer prefix. If the header is malformed, the endpoint will reject the request before any payment logic triggers. Always validate your header construction against the official Bitquery or Nansen documentation examples before deploying to production.
2. Ignoring Retry Logic for Blockchain Confirmations
Blockchain transactions are not instant. If you send a request and receive a 402, you must handle the subsequent payment and confirmation asynchronously. A frequent mistake is polling for a response immediately after signing the transaction, assuming it will be processed instantly. This leads to false negatives where the API hasn’t yet recorded the on-chain settlement. Implement exponential backoff retries to handle network latency and block times.
3. Failing to Expose the Facilitator Webhook
For async settlement to work reliably, your server must expose a webhook endpoint that the payment facilitator can call to notify you of successful payments. If this endpoint is missing or behind a firewall, the facilitator cannot confirm the transaction, and the data release will hang indefinitely. Ensure your webhook is publicly accessible, HTTPS-enabled, and capable of verifying the facilitator’s signature to prevent spoofing.

x402 Endpoint Integration FAQ
Does x402 support every blockchain?
x402 is designed to be chain-agnostic, meaning it doesn't lock you into a single network. However, your implementation depends on the specific blockchain infrastructure you choose to handle the stablecoin transactions. For example, Coinbase Developer Platform (CDP) offers a streamlined integration path for Ethereum and Base, simplifying the seller-side setup. If you are building on other chains, you will need to ensure your node provider and wallet infrastructure can reliably process the required ERC-20 transfers without latency.
How are fees handled during API calls?
Fees in x402 are typically settled in stablecoins like USDC, providing predictable costs for your API consumers. The protocol separates the payment logic from the data payload, allowing agents to pay per request without pre-funding complex escrow accounts. As noted in the official x402 documentation, this structure removes the need for human intervention, enabling seamless micro-transactions that scale with your API's usage. You define the price in your endpoint logic, and the x402 middleware handles the verification before granting access.
Can AI agents use x402 without human approval?
Yes, this is the primary use case for x402. By embedding payment verification directly into the API response, AI agents can autonomously pay for data or compute resources. The agent checks the x402 header, signs the transaction, and receives the data in a single, atomic step. This eliminates the friction of manual wallet approvals, making it viable for high-frequency, programmatic workflows where speed and autonomy are critical.
Is x402 compatible with existing REST APIs?
x402 integrates as a middleware layer rather than a replacement for your existing architecture. You can wrap your current REST endpoints to check for valid x402 payment headers before executing your business logic. This means you don't need to rewrite your core API; you simply add a verification step. If the payment is verified, the request proceeds; if not, the endpoint returns an appropriate error, ensuring secure and monetized access to your data.
No comments yet. Be the first to share your thoughts!