
Set up the x402 server environment
To monetize chain analytics data, your server must understand the x402 protocol, which allows APIs to accept crypto payments directly from AI agents or users. You will install the official SDK, configure your development environment, and verify that your local server handles HTTP 402 responses correctly.
Create a new directory for your API service. Initialize a package manager (npm, yarn, or pnpm) to manage dependencies, creating the package.json file that tracks your project's requirements.
Install the official x402 library. This package provides the middleware and utilities needed to intercept requests, verify payments, and process transactions. Run the installation command in your terminal to add it to your project dependencies.
Import the x402 middleware into your server configuration. Apply it to your API routes so that every incoming request is checked for payment status. This ensures that only paid requests are processed, protecting your chain analytics data from unauthorized access.
Run your server locally and send a test request. The server should respond with a 402 status code if no payment is detected. Once you simulate a valid payment, verify that the endpoint returns the expected analytics data. This confirms your environment is ready for integration.
For detailed integration steps, refer to the Quickstart for Sellers on the Coinbase Developer Documentation. This guide walks you through enabling payments for your API or service, ensuring your API can charge buyers and AI agents effectively.
Integrate payment logic into analytics endpoints
Wrapping your existing chain data endpoints—like wallet balances or transaction history—with x402 middleware turns free public data into a paid service. This process involves intercepting incoming requests, verifying the payment transaction on-chain, and only then returning the analytics payload.
Create a middleware function that sits between the client request and your core analytics logic. This function acts as the gatekeeper, inspecting the Authorization header or a dedicated X-Payment header for the payment proof. If the header is missing, return a 402 Payment Required response immediately to avoid wasting resources on unpaid requests.

Extract the transaction hash or signed payload from the payment header. Verify this proof against the x402 standard by checking that the transaction was sent to your API's wallet address and that the amount matches the endpoint price. Use an official RPC provider to confirm the transaction status is confirmed.

Query the blockchain to ensure funds were actually received. For Ethereum-based chains, check the value transferred and gas used. For other chains, adapt the verification logic to their specific transaction structures. This step is critical for preventing replay attacks or double-spending attempts.

After successful verification, attach the payer's wallet address or user ID to the request context. This allows your analytics logic to track data consumption and enforce usage limits. Pass this context object to your route handlers so the final response can be personalized or logged correctly.

If all verification steps pass, execute your original analytics query. Whether fetching wallet transaction history or calculating portfolio value, the logic remains the same. Return the data in your standard JSON format, ensuring response times remain competitive.
Test endpoints with AI agent clients
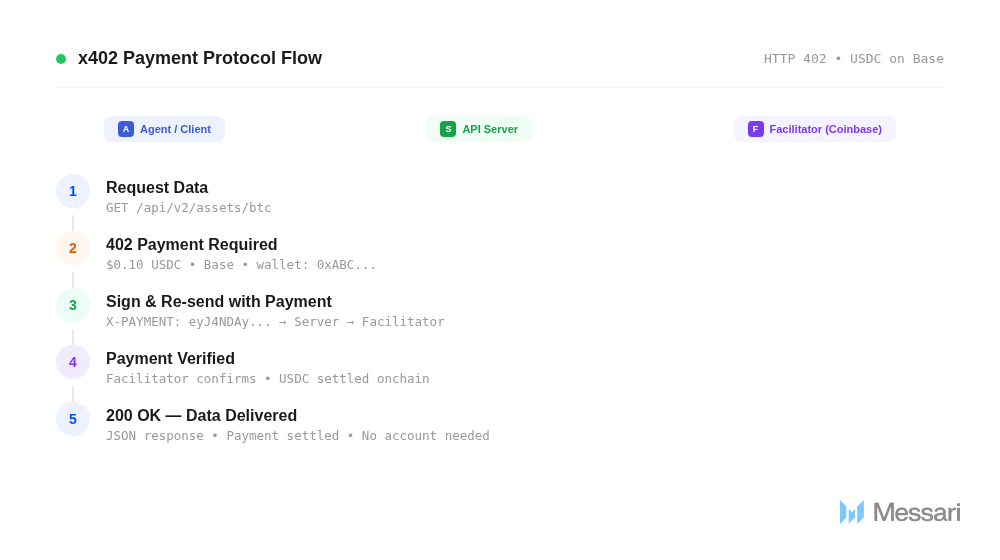
Before opening your chain analytics API to the public, verify that AI agents can actually pay for data. The x402 protocol relies on a specific handshake: the client presents payment credentials, and the server responds with the requested data. If this flow breaks, your API is just another paywall that nobody can open.
Initialize a lightweight Node.js or Python environment. Install the x402 client library or SDK that matches your server’s implementation. Configure the client with a test wallet and a small amount of the supported stablecoin (usually USDC) to cover transaction fees.
Send a standard GET or POST request to your analytics endpoint without any payment credentials. According to the x402 standard, your server should respond with a 402 Payment Required status code, including a Pay header. This header contains the payment URI and the amount due. Verify that your server correctly identifies the lack of credentials and returns the proper challenge.
Use the agent client to parse the Pay header. The client should automatically construct a transaction to the specified address and send the required amount of stablecoin. Wait for the transaction to be confirmed on the blockchain. This step validates that your agent can handle the onchain payment process without manual intervention.
Once the payment is confirmed, the agent client should automatically retry the original request, attaching the payment proof or token in the headers. Your server must verify the transaction and return the requested analytics data with a 200 OK status. Check the response body to ensure the data is complete and uncorrupted.
If any step fails, check your server’s logging for mismatches in the payment URI or signature verification errors. For detailed protocol specifications, refer to the x402 Protocol documentation to ensure your implementation aligns with the standard.
Handle common integration errors
Even with a clear spec, x402 implementations often stumble on network latency and wallet state mismatches. When integrating payment endpoints for chain analytics, you are building a bridge between two independent systems: the HTTP client and the blockchain wallet. If either side misinterprets the other’s signals, the transaction fails silently or hangs indefinitely. Fixing these errors requires strict adherence to the 402 status code workflow and robust timeout handling.
Manage timeout thresholds
APIs under load may delay their 402 response, causing the client to drop the connection before the payment proof arrives. Set your HTTP client timeout to at least 30 seconds. This gives the wallet enough time to sign the transaction and relay the proof back to the server. If the timeout is too short, you will see generic "connection reset" errors that are difficult to debug. Always log the duration between the initial request and the 402 response to identify latency bottlenecks.
Parse status codes correctly
The x402 protocol relies on the HTTP 402 status code to signal that payment is required. However, many developers mistake a 402 response for an error and retry the request, creating an infinite loop. Instead, treat 402 as a success signal that requires a specific action: signing the payment proof. If you receive a 402, extract the Pay header and use it to construct the transaction. Do not retry the original request until the payment is confirmed.
Verify wallet connectivity
Wallet connectivity failures are the most common cause of dropped payments. Ensure your integration checks for wallet availability before initiating the request. If the user does not have a compatible wallet installed, the request will fail. Use a simple availability check to guide the user toward installation or alternative payment methods. This prevents the frustration of a failed transaction that offers no clear path to resolution.
Check for header mismatches
The payment proof must match the exact payload requested by the API. If your client modifies the request body or headers after receiving the 402, the signature will be invalid. Build the payment proof using the exact data from the 402 response. Do not add extra fields or alter the order of parameters. A mismatched proof will result in a 402 rejection, forcing the user to retry the entire flow.
Verify payment confirmations and data access
In a high-stakes financial integration, granting data access before a transaction is settled is a critical vulnerability. You must ensure your x402 endpoints strictly validate blockchain confirmations before releasing any sensitive information. This process prevents double-spending attacks and ensures that the buyer has irrevocably committed the funds.
The verification logic typically follows a specific sequence:
- Receive the payment proof: Extract the transaction hash and signature from the
X-Auth-Tokenheader. - Validate the signature: Verify that the signature corresponds to the payer's public key and the payload data.
- Check blockchain status: Query the relevant blockchain node or indexer to confirm the transaction is included in a block.
- Enforce confirmation depth: Wait for the required number of confirmations (e.g., 1 for low-value, 6+ for high-value) before marking the transaction as
completed. - Grant access: Only after the status is confirmed should you return the requested API data.
Bitquery’s documentation provides a practical example of how to monitor these payment transactions in real-time, which can help you build a robust verification layer. By treating confirmation depth as a hard gate, you shift the risk from your application logic to the immutable blockchain record.
Always test this flow against a testnet first. Simulate double-spend scenarios by attempting to access data with unconfirmed transactions to ensure your endpoints reject them correctly.
No comments yet. Be the first to share your thoughts!