What x402 Means for API Monetization
x402 is not a new blockchain or a separate layer-2 network. It is an HTTP status code standard that turns any API endpoint into a payment gateway. When a client—whether a human developer or an autonomous AI agent—requests data without providing payment credentials, the server responds with a 402 Payment Required status. This response includes a payment request, typically a crypto payment link or smart contract interaction details. Once the payment is confirmed on-chain, the server grants access to the data.
For chain analytics and AI agents, this protocol removes the friction of traditional billing. AI agents operate at machine speed and volume, making manual credit card transactions or human-approved invoicing impossible. x402 enables machine-to-machine commerce by allowing agents to pay per request using stablecoins like USDC. The agent sends the payment, the blockchain confirms the transaction, and the API immediately serves the data. This creates a seamless, automated workflow where value and data exchange hands without human intervention.
The standard relies on open protocols rather than proprietary billing platforms. When you make a request to a supported endpoint without an API key, the server returns the 402 status with specific payment instructions. This approach aligns with the decentralized nature of on-chain data, allowing developers to monetize analytics directly through the same protocol layer that generates the data.
x402 leverages the existing HTTP/1.1 and HTTP/2 specifications. It uses the 402 status code, which was originally reserved for payments but rarely implemented until now. This means it works with existing web infrastructure, requiring no special middleware or proxy servers to function.
The x402 Payment Flow Explained
The x402 protocol transforms standard HTTP interactions into on-chain financial transactions. Instead of relying on traditional payment gateways like Stripe, the protocol uses the HTTP 402 status code to indicate that payment is required to access the resource. This approach allows any API endpoint to become a payment point, enabling autonomous agents and developers to transact directly using stablecoins like USDC.
The flow begins when a client sends a request to an x402-enabled endpoint. The server responds with a 402 Payment Required status code, accompanied by a specific header that defines the payment terms. This header includes the x-payment-amount (the required value), x-payment-currency (typically USDC), and x-payment-chain (the target blockchain, such as Base or Ethereum). This structured response ensures the client knows exactly what is needed to proceed.
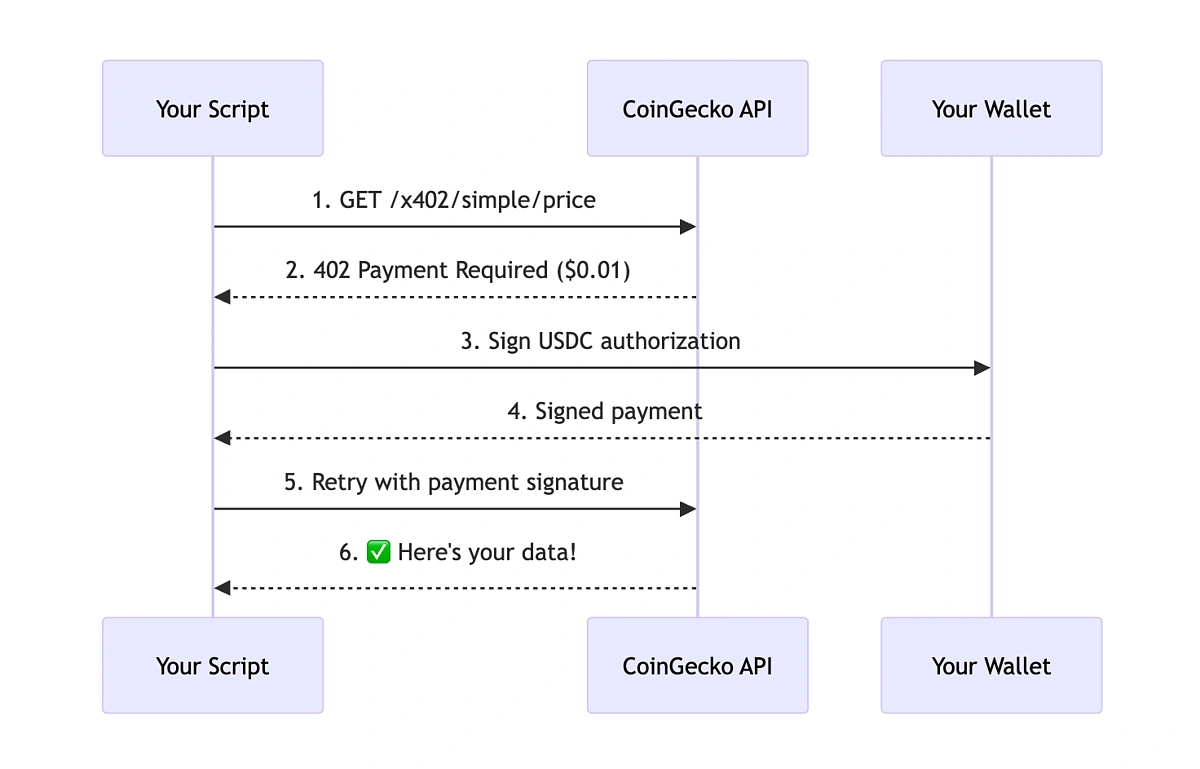
The client initiates a request to the API endpoint. The server recognizes the need for payment and returns a 402 Payment Required status. Crucially, the response includes headers like x-payment-amount, x-payment-currency, and x-payment-chain, which specify the exact USDC amount and blockchain required for the transaction.

The client does not send funds directly to the server. Instead, it interacts with a third-party facilitator (such as Thirdweb or similar infrastructure providers). The client signs a transaction approving the transfer of USDC to the facilitator's escrow contract. The facilitator validates the signature and the client's balance, ensuring the payment is legitimate before proceeding.
Once the facilitator confirms the payment is secured, it releases a cryptographic proof (a signature or token) to the client. This proof is attached to the original request as a header (e.g., x-payment-proof). The facilitator then settles the USDC with the API provider's wallet on-chain, completing the transaction.
The server receives the request with the attached payment proof. It verifies the proof against the facilitator's public key or on-chain state. If valid, the server grants access to the requested data or service, returning a 200 OK response with the payload. If the proof is missing or invalid, the server continues to return a 402.
This mechanism decouples payment from access. The API provider receives funds immediately upon settlement, while the client only pays for verified access. For developers building chain analytics APIs, this flow ensures that data monetization is automated, transparent, and trustless.
The x402 flow uses HTTP 402 responses to gate API access. A facilitator manages the USDC payment via smart contracts, releasing a cryptographic proof to the client that grants access to the protected resource.
Implementing x402 for Chain Analytics
Building an x402 endpoint for chain analytics requires shifting from traditional API key authentication to a payment-first flow. Instead of returning a 401 Unauthorized error for unauthenticated requests, your server returns a 402 Payment Required status code along with a structured invoice. This forces the client—whether a human developer or an autonomous agent—to settle the payment before accessing the data.
The implementation relies on facilitators like Thirdweb or the Coinbase CDP to handle the complex blockchain interactions. These tools abstract the signing, transaction submission, and confirmation logic, allowing you to focus on the analytics logic itself. We will use USDC as the primary settlement currency for clarity, as it is widely supported across the EVM-compatible chains used for most chain analytics.
1. Configure the Facilitator SDK
Start by initializing the facilitator SDK in your backend environment. If you are using Coinbase CDP, you will need to authenticate your seller account and define the supported chains and tokens. For Thirdweb, you will configure the payment contract address and the token whitelist. This step ensures that your server is ready to accept payments in USDC on your chosen networks.
2. Define the Endpoint Logic
Create a specific route for your analytics data, such as /api/v1/tx-history. Inside this route, check for the presence of a valid payment token in the request headers or body. If no valid payment is found, construct a 402 response. This response should include the Pay header or a JSON body detailing the amount, the token address, and the destination wallet address for the payment. This structure tells the client exactly what is needed to access the data.
3. Handle Payment Verification
Once the client submits a payment, your server must verify the transaction on-chain. Use the facilitator's webhook or polling mechanism to confirm that the USDC transfer has been confirmed. Do not rely on client-side promises; always verify the on-chain state. Once confirmed, issue a temporary access token or session key that allows the client to retrieve the analytics data for that specific request or a predefined time window.
4. Return the Analytics Data
After successful payment verification, execute your chain analytics query. This might involve indexing historical transactions, calculating wallet balances, or aggregating on-chain metrics. Return this data in the response body. Since the payment is already settled, you can now provide high-volume or real-time data that would typically be restricted by rate limits in traditional API models.
5. Compare Facilitator Options
Choosing the right facilitator depends on your infrastructure needs. Coinbase CDP offers a streamlined quickstart for sellers with built-in wallet management, while Thirdweb provides flexible smart contract integration for more custom payment flows. Bitquery offers specialized x402 data APIs that integrate directly with their existing analytics infrastructure.
6. Test with USDC Payments
Before going live, test the entire flow using USDC on a testnet. Use a tool like Postman or a simple script to trigger a 402 response, then use a testnet faucet to acquire USDC. Submit the payment and verify that your server correctly identifies the transaction and returns the analytics data. This ensures that your payment verification logic is robust and that your analytics queries are efficient.
Initialize the SDK (Coinbase CDP or Thirdweb) and define supported chains and USDC token addresses. This sets the foundation for accepting payments.
Build the API route that returns a 402 status with payment details (amount, token, wallet) when no valid payment is detected.
Confirm the USDC transfer on-chain using the facilitator's verification tools. Never trust client-side claims; always verify on-chain state.
Once payment is confirmed, execute your chain analytics query and return the data. This is where the value of your API is delivered.
Real-world analytics implementations
Theoretical payment flows are one thing; production-grade analytics APIs are another. Two major blockchain data providers, Nansen and Bitquery, have already integrated x402 to automate access to their proprietary datasets. These implementations demonstrate how to handle high-frequency data requests while ensuring payment verification happens at the network layer rather than in application logic.
Nansen uses x402 to gate access to its AI-powered wallet and token analytics. Instead of managing traditional API keys or subscription renewals, developers and AI agents submit USDC payments directly with their requests. The x402 middleware validates the transaction on-chain before returning the enriched on-chain intelligence. This approach reduces friction for automated agents that need to pay per-query without maintaining persistent billing relationships.
Bitquery takes a slightly different approach by exposing its GraphQL endpoints through x402. Their documentation details how to access payment transaction data, monitor server activity in real-time, and analyze payment analytics. The implementation allows clients to pay for specific query types or data volumes using USDC. This model is particularly useful for projects that need bursty access to historical chain data without committing to a fixed monthly fee.
Both platforms highlight a shift toward programmable data access. By letting smart contracts or middleware handle the payment logic, these APIs remove the need for complex OAuth flows or manual invoice processing. For developers building tools that rely on real-time blockchain data, this means faster integration and more predictable costs.
Build Your x402 Endpoint Checklist
Before flipping the switch on your analytics API, run through this integration checklist. The goal is to ensure your endpoint can handle USDC payments without breaking existing traffic or security models.
-
Validate the
PayToHeader: Ensure your middleware extracts thePayToheader correctly. This is the core signal that tells your API a payment is attached to the request. -
Verify USDC Balance: Check that the sender’s wallet has sufficient USDC balance. You don’t need to hold the funds, but the transaction must be valid before you process the data.
-
Handle Rejection Gracefully: If the payment fails or the signature is invalid, return a
402 Payment Requiredstatus. Do not return data, and do not crash the server. -
Log Transaction Hashes: Store the on-chain transaction hash in your request logs. This provides an audit trail for disputes and helps you track revenue per endpoint.
No comments yet. Be the first to share your thoughts!