Why x402 changes API monetization
The traditional API economy runs on friction. Developers sign up for accounts, navigate tiered subscription plans, and manage credit card billing cycles. This human-centric model works for occasional calls but breaks down when the client is an AI agent. Agents don’t have bank accounts, they don’t understand monthly invoices, and they certainly don’t want to wait for human approval to fetch data.
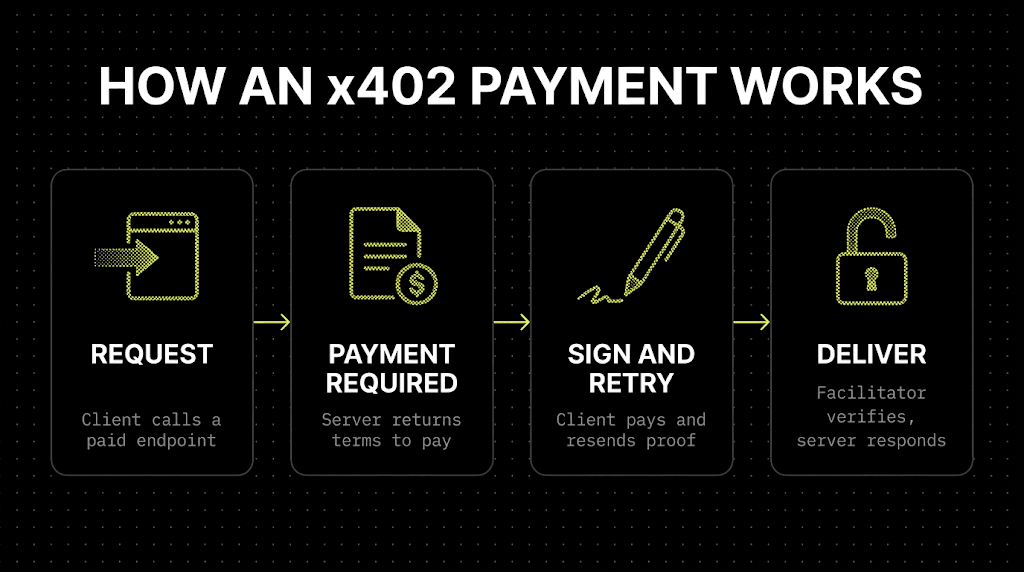
x402 solves this by turning every API endpoint into a self-contained payment gateway. Instead of a subscription, the protocol requires a stablecoin payment—typically USDC—directly with each request. This shifts the model from "who you are" to "what you send." If the payment is valid, the data flows. If it isn’t, the request is rejected. This removes the need for user authentication, account creation, or complex billing integrations.
For chain analytics, this is a game-changer. High-frequency data retrieval by autonomous agents happens in milliseconds. Waiting for a human to authorize a transaction or checking a subscription status adds latency that agents can’t afford. With x402, the payment and the data delivery are atomic. The agent pays, and the response is immediate.
The result is a more fluid internet where data is a commodity, not a locked resource. Sellers can monetize their endpoints directly, and buyers—whether human or machine—pay only for what they use. This aligns incentives perfectly: the more valuable the data, the more the agent can afford to pay, and the more the seller earns.
Integrating x402 into your analytics API
Integrating x402 transforms your analytics API from a simple data provider into a self-sovereign revenue engine. The process is straightforward: you wrap your existing endpoints with a payment verification layer that accepts USDC on-chain before delivering data. This section outlines the concrete steps to get your first endpoint monetized.
1. Verify the USDC Stablecoin Peg
Before writing code, understand the asset you are accepting. x402 relies on USDC, a stablecoin pegged 1:1 to the US dollar. For analytics APIs, this means your pricing is predictable and immune to the volatility that plagues other crypto payments.
Figure 1: USDC/USD price stability ensures consistent API pricing.
2. Set Up Your Merchant Identity
You need a wallet to receive payments. The Coinbase Developer Platform (CDP) provides a managed wallet solution that handles key management and security, which is ideal for server-to-server API interactions. Alternatively, you can use your own non-custodial wallet if you prefer full control.
Visit the CDP Quickstart for Sellers to generate your merchant credentials. These credentials allow your backend to verify that a transaction has been confirmed on-chain.
3. Create Your First x402 Endpoint
Start with a simple endpoint, such as a single-chain transaction lookup. Wrap your existing logic in a payment check:
- The buyer sends a request to your API.
- Your server checks if a recent USDC payment exists for that buyer’s wallet address.
- If payment is verified, return the analytics data.
- If not, return a
402 Payment Requiredstatus with a payment link.
This "paywall" logic is handled by your backend, giving you full control over pricing and access.
4. Test with a Facilitator
Testing live crypto payments can be slow and costly. Use an x402 facilitator or a testnet environment to simulate transactions. Facilitators like Bitquery or specialized x402 gateways can help you validate that your payment verification logic works before going public.
5. Monitor and Optimize
Once live, track your revenue and API usage. x402 payments are transparent on-chain, so you can audit every transaction. Use this data to adjust pricing tiers or offer discounts for high-volume buyers.
| Method | Control | Setup Difficulty | Best For |
|---|---|---|---|
| CDP Managed Wallet | Medium | Easy | Fast integration |
| Self-Custody Wallet | High | Hard | Security-focused |
Table 1: Choosing your payment infrastructure.
By following these steps, you can integrate x402 into your analytics API in under a day. The result is a seamless, automated payment system that scales with your data demand.
Monitoring payments with on-chain data
Once your x402 endpoint is live, the real work begins: verifying that the payment actually cleared and understanding how users interact with your API. Unlike traditional web traffic, on-chain transactions are public but require specific tools to interpret. This is where chain analytics APIs like Bitquery become essential for any serious API seller.
Bitquery provides a GraphQL interface specifically designed to query x402 payment events across multiple blockchains. Instead of manually scanning block explorers, you can pull transaction data directly into your server logs or dashboard. This allows you to correlate incoming API requests with successful crypto payments in real-time, ensuring you only serve content when the token is confirmed.
The visual complexity of compliance and verification is a major part of the x402 ecosystem. As noted in recent analyses of agent-native crypto compliance, building KYA/KYT (Know Your Agent/Transaction) mechanisms is critical for enterprise adoption. Monitoring these payments isn't just about accounting; it's about maintaining the integrity of your data pipeline and ensuring that your endpoints are being accessed by legitimate, paying users.
To contextualize the value of these transactions, it helps to track the stablecoin prices being used. Since most x402 implementations rely on USDC or USDT for predictable pricing, monitoring the USD value of each payment helps you track revenue accurately.
By integrating these analytics, you move from a passive endpoint to an active, monitored service. You can identify peak usage times, detect fraudulent patterns, and generate reports for stakeholders. This level of visibility turns your API from a simple code snippet into a robust, monetizable product.
Common integration mistakes to avoid
Implementing x402 is straightforward when you understand the mechanics, but several pitfalls can break your endpoint or leave you with unpaid requests. The most critical errors involve how you handle the facilitator layer and how you estimate transaction costs. Getting these wrong doesn't just cause errors; it creates friction that stops AI agents from paying.
Mismanaging the Facilitator Layer
x402 relies on a facilitator to bridge the gap between the AI agent's wallet and your API. A common mistake is assuming the facilitator handles all validation. In reality, the facilitator only processes the payment; your endpoint must still verify that the payment matches the expected parameters. If you skip this verification step, you risk accepting stale or invalid transactions. Always ensure your server checks the transaction hash against the blockchain state before returning data.
Incorrect Gas Estimation
Another frequent error is underestimating the gas required for the transaction. AI agents often operate with tight budgets, and if the gas limit is too low, the transaction will fail. This doesn't just annoy the user; it wastes their time and resources. Use dynamic gas estimation based on current network conditions rather than hardcoding values. This ensures your endpoint accepts payments even during periods of high network congestion.
Ignoring Stablecoin Volatility
While x402 is designed for stablecoins, they are not perfectly pegged. A common oversight is failing to account for minor fluctuations in USDC or other stablecoins. If your endpoint expects an exact amount without a tolerance buffer, small price movements can cause payment failures. Implement a small tolerance range, such as 0.1%, to accommodate these minor shifts without compromising security.
Failing to Handle Reverts
Blockchain transactions can revert for many reasons, including insufficient funds or contract errors. A robust x402 implementation must handle these reverts gracefully. If a transaction fails, your endpoint should return a clear error message explaining why, rather than a generic timeout. This helps developers debug their integrations faster and improves the overall user experience.
Verify settlement and revenue
Before you mark an endpoint as "done," you need to confirm the buyer actually paid. x402 handles the heavy lifting, but you must validate the proof to ensure your revenue matches your server logs.
1. Check the Facilitator Response
When a buyer calls your endpoint, the x402 facilitator intercepts the request. It validates the transaction and returns a success response only if the payment is confirmed on-chain. Your API should check this response first. If the facilitator returns an error, the buyer hasn't paid yet, and you should deny access.
2. Verify the On-Chain Transaction
For high-stakes analytics, don't just trust the facilitator's word. Verify the transaction hash returned by the facilitator on the blockchain. This is especially important if you're using USDC, where stablecoin mechanics matter. You can use a live widget to monitor USDC trends and confirm the asset's stability, ensuring your revenue isn't eroded by volatility.
3. Grant Access
Once you've confirmed the payment, grant the buyer access to your data. This might involve updating a database record, issuing a temporary token, or simply returning the requested JSON payload. Keep a log of the transaction hash and the timestamp for reconciliation. This audit trail is your proof of sale.
-
Check facilitator response for success
-
Verify on-chain tx hash
-
Grant access to endpoint
No comments yet. Be the first to share your thoughts!