Why chain analytics need x402
Traditional API key management creates a friction bottleneck for autonomous AI agents. Developers spend significant time provisioning credentials, managing rotation, and handling billing cycles before an agent can even make its first request. This overhead slows down programmatic workflows and introduces security risks associated with storing static secrets in agent memory.
x402 solves this by replacing authentication with payment. It is an open HTTP payment protocol that enables frictionless, per-request stablecoin transactions. Instead of an API key, the agent presents a valid payment proof. When a request arrives without proper payment, the server responds with a 402 Payment Required status code, signaling the agent to settle the fee before data delivery.
This shift transforms data access from a subscription model into a utility-like flow. Agents can query chain analytics on-demand, paying only for the specific data points they need. This eliminates the need for upfront commitments and allows for granular cost control. The protocol is designed to be lightweight, relying on standard HTTP headers and existing stablecoin infrastructure to handle settlements automatically.
For developers building agentic workflows, this means removing the human intervention step from data acquisition. An agent can request a wallet’s transaction history, receive a 402, pay USDC, and receive the JSON response—all within milliseconds. This capability is essential for scaling real-time analytics applications that require high-frequency, unpredictable data access.
How x402 endpoints work
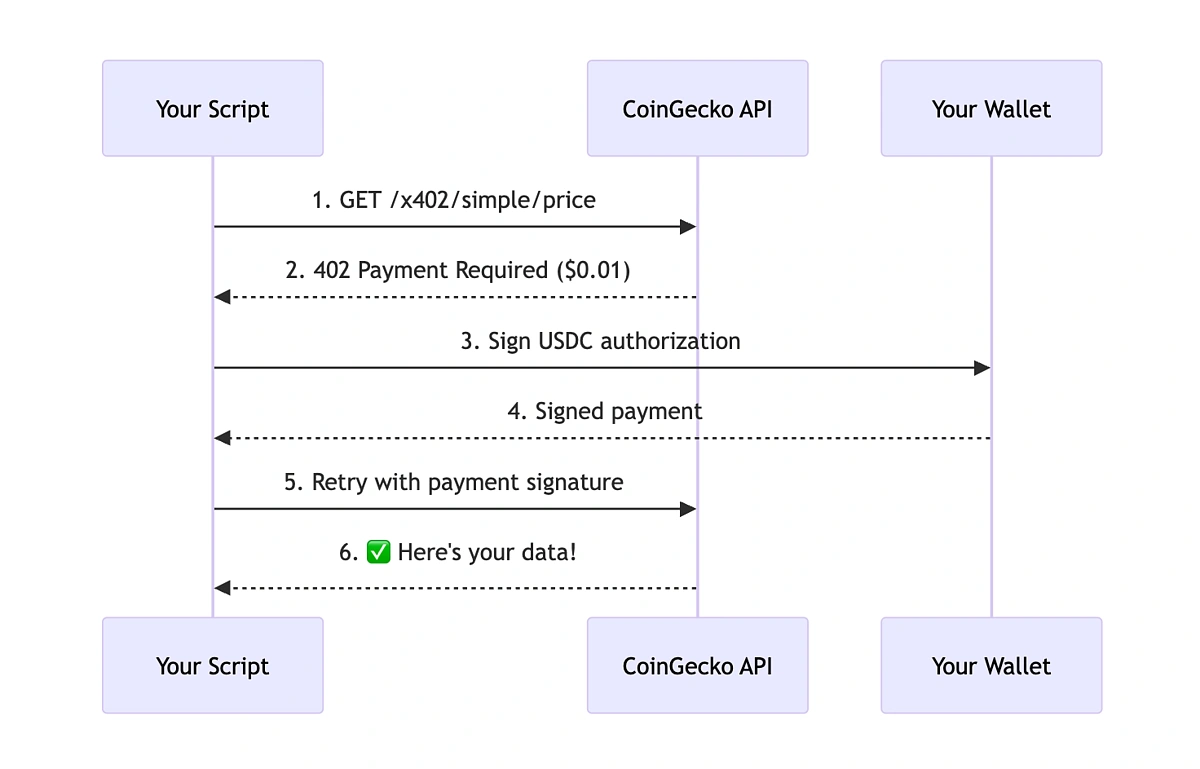
x402 turns standard HTTP into a payment rail. When a client requests data from an x402-enabled endpoint, the server doesn't just return JSON. It returns a 402 Payment Required status code. This response acts as a structured invoice, telling the client exactly what to pay and where to send the funds.
The flow follows a strict sequence:
- Request: The client sends a standard HTTP GET or POST to the API endpoint.
- 402 Response: The server responds with a
402status and a JSON body containing the payment details. This includes thefacilitatorURL (where the payment is processed), theamountin USDC, and thechainId. - Payment: The client (or an AI agent acting on its behalf) uses the facilitator to sign and broadcast a USDC transaction. The facilitator handles the escrow and verification logic, ensuring the payment is confirmed on-chain.
- Access: Once the payment is verified, the server grants access to the requested data. The response body now contains the actual chain analytics data, often accompanied by an
Authorizationheader or token for subsequent requests.
The Role of Facilitators
Facilitators are the backbone of this system. They are smart contracts or middleware services that manage the payment flow. Instead of the API server managing private keys or complex wallet logic, it delegates trust to the facilitator. The facilitator verifies the on-chain transaction and signals the server that payment is complete.
This architecture allows developers to monetize data without building a full payment infrastructure. The server only needs to check the facilitator's status. If the facilitator confirms the payment, the data is released. This keeps the API logic clean and focused on data retrieval, while the payment mechanics are handled off-chain by the facilitator protocol.
Visualizing the Flow
The following chart shows USDC price action. Since x402 endpoints typically settle in USDC, understanding the stablecoin's stability is crucial for pricing your data endpoints. A volatile settlement layer would introduce significant friction for both buyers and sellers.
Integrate x402 into your API
Turning your chain analytics endpoint into a paid service requires three main moves: installing the SDK, adding payment middleware, and wiring up dynamic routes. The Coinbase Developer Documentation provides the official reference for this workflow, which we will follow here.
Start by adding the official SDK to your project. For Node.js environments, run npm install @coinbase/x402-sdk. This package provides the core classes needed to parse x402 payment headers and verify on-chain settlements before serving data.
Create a middleware function that intercepts incoming requests. This function must check for the x-402 header, which contains the transaction hash or payment proof. Use the SDK to verify that the payment was made to your designated wallet address. If the payment is valid, attach a payment_verified flag to the request object; otherwise, return a 402 Payment Required response with instructions on how to pay.
Define your API routes to accept dynamic parameters for data queries. When a request passes the middleware check, extract the query parameters (such as token address or time range) and fetch the corresponding chain data. Ensure your pricing logic is transparent; for example, you might charge a base fee for standard queries and a premium for real-time WebSocket streams. Display the current USDC price to help agents calculate exact payment amounts.
By following these steps, your API will automatically handle payments from AI agents and human developers alike. The key is keeping the verification logic tight and the error messages clear so that integrations don't break during testing.
How providers monetize chain data with x402
Providers like Bitquery, Nansen, and Quicknode are shifting from traditional subscription models to x402 endpoints. This change allows AI agents to pay for high-value data—such as yield scoring or gas oracles—without manual onboarding or API key management.
Instead of waiting for human approval, an agent can query an endpoint, receive a 402 Payment Required response with a payment request, settle the transaction, and immediately access the data. This frictionless flow is ideal for automated agents that need real-time analytics.
Traditional vs. x402 Access
The table below compares the operational differences between legacy API access and the new x402 standard.
| Feature | Traditional API | x402 Endpoint |
|---|---|---|
For example, Bitquery’s x402 documentation demonstrates how agents can access payment transaction data directly. Similarly, Nansen’s API returns a 402 response when no key is present, allowing the agent to handle the payment flow natively. Quicknode also supports this, removing the need for account creation for simple data requests.
This model turns data into a commodity that agents can consume programmatically, opening up new markets for chain analytics.
Common integration mistakes
Building an x402 endpoint is straightforward until you hit the edge cases that break automated agents. Most developers stumble on three specific implementation details: facilitator URL handling, payment scheme flexibility, and retry logic. Fixing these early saves hours of debugging later.
Wrong facilitator URL
Agents don't guess where to send payments; they follow the x-payments-url header in the response. If you return a local endpoint like http://localhost:3000/pay or omit the header entirely, the agent cannot complete the transaction. Always ensure the URL is publicly accessible and points to your payment verification endpoint.
Ignoring dynamic payment schemes
Not all agents pay the same way. Some send the exact amount specified in your x-payments-amount header, while others send the maximum allowed under an x-payments-upto limit. If your code only checks for an exact match, you will reject valid payments from agents using the "upto" scheme. Your verification logic must handle both exact matches and amounts less than or equal to the limit.
Failing to handle 402 retries
Agents are designed to retry failed requests. If you return a 402 status code without a valid x-payments-url or with an invalid signature, the agent will retry immediately. If your backend doesn't handle idempotency or temporary network blips gracefully, you might lock out legitimate users or flood your logs with duplicate payment attempts. Always verify the payment signature thoroughly before granting access.
Launch and monitor your x402 endpoint
Before going live, verify your integration against the official Coinbase Developer Documentation quickstart. Test your endpoint with the x402 facilitator to ensure payment headers are correctly parsed and USDC is settled to your wallet address. This step confirms that AI agents and clients can successfully trigger your chain analytics API.
Send a test request through the x402 facilitator to simulate a real transaction. Verify that the response includes the correct payment proof and that your server rejects requests without valid headers.

Track transaction volume and success rates using on-chain explorers or your node provider. Set up alerts for failed payments to quickly identify integration issues or network congestion affecting your API users.
Once stable, expand your endpoint to support higher throughput. Consider caching frequent queries to reduce gas costs and improve response times for paying clients.
No comments yet. Be the first to share your thoughts!