How x402 payments work for APIs
x402 is an open payment protocol developed by Coinbase that enables instant, automatic stablecoin payments directly over HTTP [src-serp-6]. It was built to solve a specific problem: traditional API keys are static and hard to track, making them unsuitable for the fast-paced world of AI agents.
With x402, an AI agent doesn't need a pre-approved credit line or a stored API key. Instead, the agent sends a small crypto payment (usually in USDC) directly in the HTTP request headers. The API server verifies the transaction on-chain and immediately grants access if the payment is valid. This turns every API call into a secure, self-contained transaction.
Note: x402 is an open payment protocol developed by Coinbase that enables instant, automatic stablecoin payments directly over HTTP.
This model shifts the risk from the API provider to the user. Providers no longer need to worry about unpaid bills or subscription churn; they get paid instantly. For developers, it means you can build APIs that are monetized by usage, not by monthly contracts. It’s a simple, robust way to handle micropayments at scale without the friction of traditional banking.
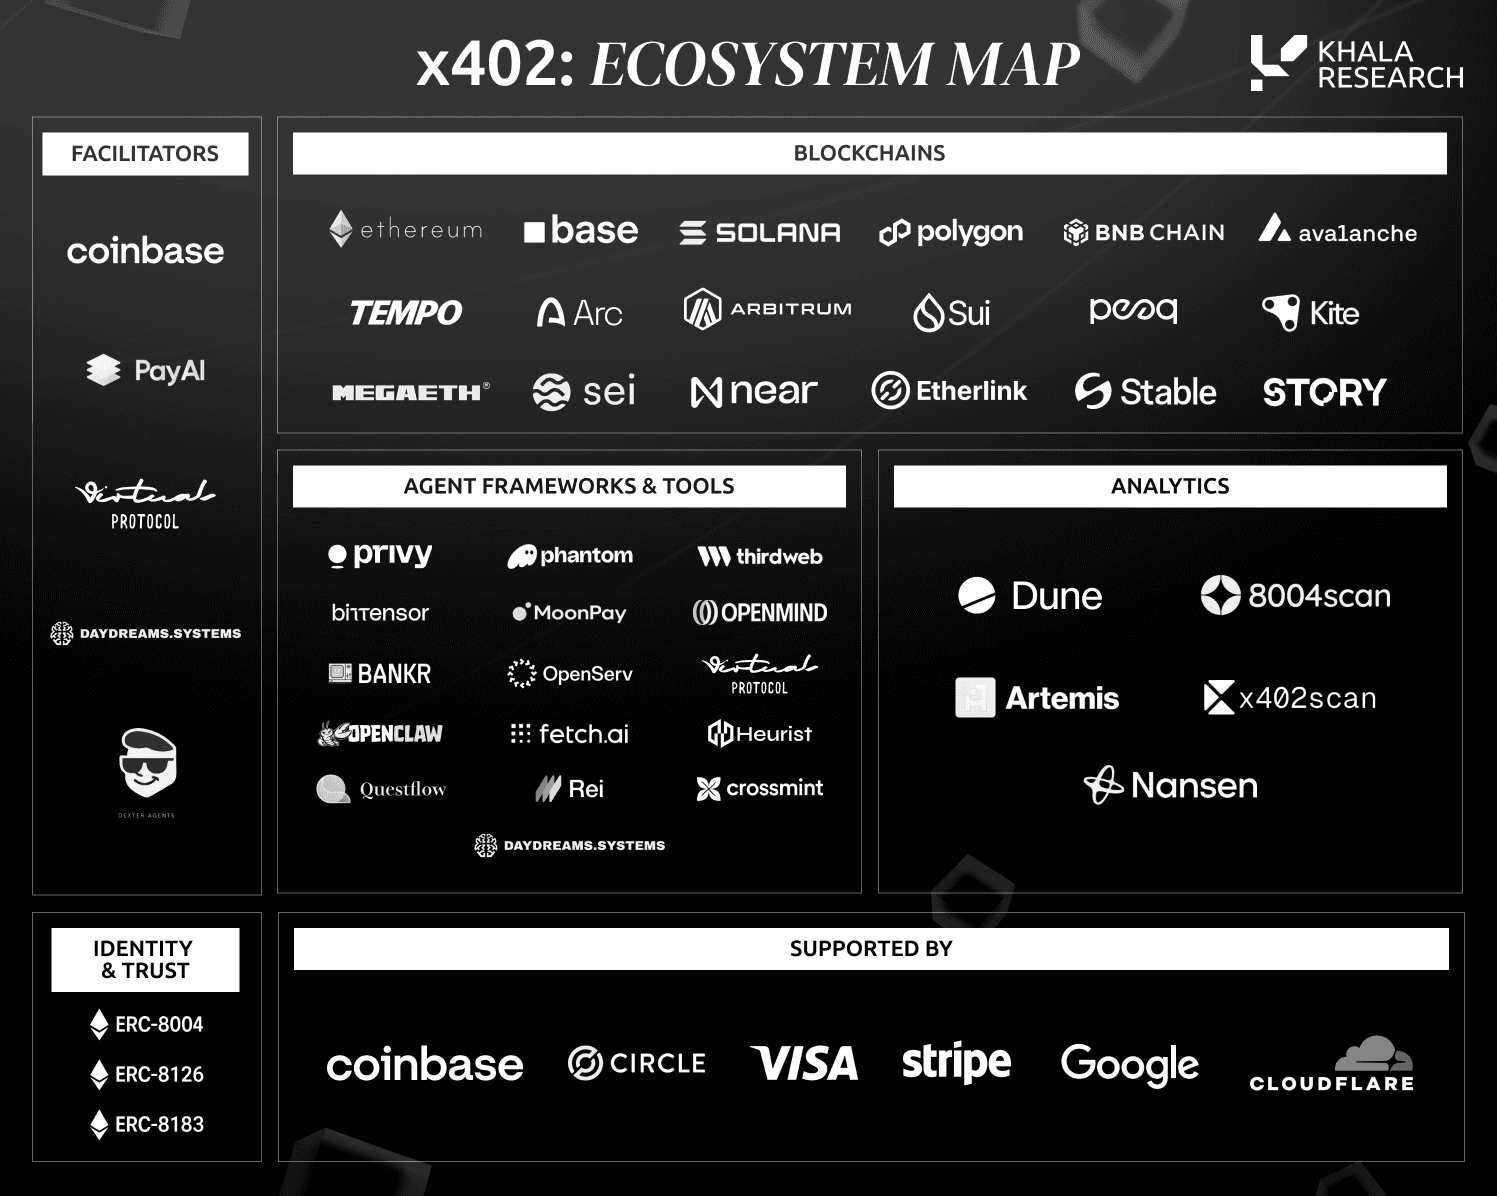
The protocol supports multiple blockchains and stablecoins, allowing flexibility in how you handle transactions. Whether you’re building a data endpoint or an AI inference service, x402 provides a standardized way to accept payments. This standardization is critical for interoperability, ensuring that different agents and APIs can communicate and transact seamlessly.
By removing the need for complex authentication systems, x402 simplifies the developer experience. You focus on building your API’s logic, while the protocol handles the money. This is why x402 is becoming the standard for agent-to-API micropayments, distinguishing itself from the rigid, key-based models of the past.
Set up your development environment
Building an x402-compliant API requires a specific stack that can handle HTTP requests and on-chain payments simultaneously. Because x402 integrates payment logic directly into the API response, you need tools that can interact with both web servers and blockchain networks without friction.
We will walk through the essential steps to get your local environment ready. This setup focuses on the most accessible path for building chain analytics APIs: using Hono for the framework, Cloudflare Workers for deployment, and Solana for the underlying settlement layer. This combination is currently the most documented and reliable way to implement x402 endpoints.
Before writing code, you must decide which blockchain will handle the micropayments. While x402 is protocol-agnostic, most current implementations and tutorials rely on Solana or Base due to low fees and high throughput. For this guide, we recommend Solana because its transaction finality is fast and the ecosystem for x402 tooling is mature. Ensure you have a wallet configured with testnet tokens so you can experiment without risking real capital.
Hono is a lightweight web framework that works exceptionally well in edge environments like Cloudflare Workers. It is the recommended choice for x402 APIs because it allows you to write standard HTTP handlers while keeping the bundle size small. Install Hono using your preferred package manager (npm, yarn, or pnpm) and initialize a new project. This will serve as the backbone of your API, handling incoming requests from agents or users.
Deploying to Cloudflare Workers is ideal for x402 endpoints because they offer low latency and global availability. Set up a Cloudflare account and create a new Worker project. You will need to configure the wrangler.toml file to define your environment variables, including your Solana private key (for signing payment proofs) and any API keys for your chain analytics data provider. This step ensures your code can securely interact with the blockchain without exposing sensitive credentials.
The x402 SDK provides the necessary functions to validate payment proofs and generate the required HTTP headers. Install the official SDK package and import it into your Hono application. This library handles the complex cryptography behind the scenes, allowing you to focus on your chain analytics logic. You will use the SDK to verify that a user has attached a valid payment signature to their request before serving them the data.
Create a simple /health endpoint that returns a JSON response. Deploy this to your Cloudflare Worker and test it locally. Once confirmed, add a second endpoint that attempts to validate an x402 payment proof. If the validation fails, the SDK should return a 402 status code with the appropriate error message. This initial verification ensures that your environment is correctly configured to handle the x402 protocol before you build out your full analytics API.


As an Amazon Associate, we may earn from qualifying purchases.
Implement the payment gateway logic
The core of an x402 integration is the facilitator. This component acts as a middleman between your API and the blockchain, verifying that a user has paid before they access your chain analytics data. Without this check, your endpoints are wide open. With it, you create a secure, automated payment gate.
We will use Thirdweb's x402 facilitator. It handles the complex cryptography and transaction monitoring so you can focus on serving data. The process involves setting up the facilitator, configuring your endpoint to require payment, and handling the response.
Start by installing the Thirdweb SDK and initializing the facilitator in your server environment. This step sets up the connection to the blockchain network (e.g., Solana, Ethereum) where your USDC payments will be settled. The facilitator needs your contract address and the specific token you accept.
import { createThirdwebClient } from "thirdweb";
import { createX402Facilitator } from "@thirdweb-dev/x402";

const client = createThirdwebClient({ clientId: process.env.THIRDWEB_CLIENT_ID });
const facilitator = createX402Facilitator({
  client,
  chain: "solana", // or your preferred chain
  contractAddress: process.env.CONTRACT_ADDRESS,
});
Wrap your chain analytics API route with the facilitator's middleware. This middleware intercepts incoming requests and checks for a valid x402 payment header. If the payment is missing or invalid, the request is rejected immediately, preventing unauthorized access to your sensitive data.
import { x402 } from "@thirdweb-dev/x402";

export const GET = x402(async (req) => {
  // If we reach here, payment is verified
  return Response.json({ data: "Your chain analytics data" });
}, {
  price: "0.001", // Amount in USDC
  token: "USDC",
});
Define what happens when a user fails to pay or when the transaction is still pending. You should return clear HTTP error codes (like 402 Payment Required) so the client knows exactly what went wrong. This feedback loop is critical for user experience and debugging.
export const GET = x402(async (req) => {
  try {
    // Your logic to fetch chain analytics
    const analyticsData = await getChainData();
    return Response.json(analyticsData);
  } catch (error) {
    // Handle specific x402 errors
    if (error.code === "PAYMENT_REQUIRED") {
      return Response.json({ error: "Payment required" }, { status: 402 });
    }
    return Response.json({ error: "Internal server error" }, { status: 500 });
  }
}, { price: "0.001", token: "USDC" });
Before going live, use a testnet environment to simulate payments. This ensures your facilitator correctly validates transactions and that your API responds appropriately to both successful and failed payment attempts. Test with small amounts to avoid draining your wallet.
Once tested, deploy your endpoint to production. Monitor the facilitator's logs for any failed verifications or unexpected errors. Regularly review your transaction volume and revenue to ensure the payment flow is functioning as intended.
Implementing this logic correctly is non-negotiable. A single misconfiguration can expose your data or lose you revenue. Follow these steps precisely, and you'll have a secure, payment-gated API ready for the x402 economy.
Test with real agent transactions
You can read the documentation until the screen blurs, but nothing replaces seeing the payment flow work end-to-end. The goal here is to validate that your x402 endpoint correctly handles the HTTP 402 response, processes the on-chain payment, and returns the requested chain analytics data.
We will use a testnet environment to simulate the transaction without risking real funds. This mirrors the live production environment closely enough to catch logic errors, permission issues, or data format mismatches before you go public.
A checklist helps ensure you haven't missed a configuration detail before you declare the test successful.
If your endpoint fails to return data after payment, the most common culprit is a mismatch in the payment verification logic. Ensure your server is listening for the correct event or transaction hash. A silent failure here is costly because you might think the system is broken when it is just waiting for a confirmation that never arrived.
Common integration mistakes to avoid
Even with clear documentation, x402 implementations often fail at the edge cases. The protocol is simple in theory but strict in practice. A single misconfigured header or an incorrect token assumption can break your agent’s ability to pay or your API’s ability to verify. Here are the most frequent pitfalls we see in production environments.
Misconfigured Accept Headers
The Accept: application/x402 header is your primary handshake signal. If your endpoint doesn’t explicitly recognize this MIME type, it may return a 406 Not Acceptable or, worse, a generic 200 OK with no payment challenge. Always ensure your API router checks for this header before attempting to process the request. Treat it like a gatekeeper: if it’s missing, deny access or redirect to a standard payment flow.
Incorrect Token Handling
x402 relies on specific ERC-20 token contracts for payment verification. A common error is assuming that USDC on Ethereum Mainnet is the same as USDC on Arbitrum or Base. If your verification logic doesn’t account for the chain-specific contract address, the payment will fail validation. Always hardcode or dynamically fetch the correct token contract for the target chain. Never rely on symbolic names alone.
Ignoring the Payment Challenge Response
When an API accepts x402, it must return a 402 Payment Required status with a Payment-Required header containing the payment URI. If your client doesn’t parse this URI correctly or fails to sign the transaction with the right wallet, the payment loop breaks. Ensure your client library strictly follows the challenge-response sequence. Skipping this step results in silent failures where the agent thinks it paid, but the API never received the funds.
Overlooking Gas Limit Estimates
Agents often underestimate the gas required for on-chain transactions, especially during network congestion. If the transaction fails due to insufficient gas, the payment is never recorded, and the API denies access. Always include a buffer in your gas limit estimates. Use real-time gas price oracles rather than static values to ensure your agent can complete the transaction within a reasonable time frame.
Frequently asked: what to check next
Here are answers to common technical questions about x402 compatibility, supported networks, and data privacy for chain analytics.
No comments yet. Be the first to share your thoughts!